Introduction

Use this guide to replace the refrigerator compartment light in an LG Refrigerator. The process involves removing the light unit, disconnecting it, and installing a new one. This guide is for LED based units.

This guide will work for most LG refrigerators. This guide is written with an LG model LFX25973 refrigerator. If you have a different model, you may encounter some minor disassembly differences, but the overall repair process will be the same.

  1. SaOfLbkeAxgmho5g
    • Unplug your refrigerator before you begin your repair.

    • If you are testing or repairing the following items, you may also need to shut off and disconnect the water supply:

    • Condenser fan motor

    • Compressor motor and thermal overload device

    • Water supply valve assembly

  2. Go1kktiajsPNFQs4
    Go1kktiajsPNFQs4
    njmtdBTT4jfXDkUt
    OgSX5MTM1eVgCaHq
    • Open both refrigerator doors fully.

  3. RHaoJxwSdpC1kUni
    RHaoJxwSdpC1kUni
    P1in2SNQBnCSpJZD
    RiOJvHKNIuIoI6Mf
    • Lift up the front edge of the shelf to release it.

    • Unhook the shelf and remove it.

    • Repeat the last two steps for each shelf you wish to remove.

  4. Xu6AJBZC4HKLRmtF
    • Use a Phillips screwdriver to remove the screws that secure the light unit.

  5. 42xT66r3lc6IIHPl
    42xT66r3lc6IIHPl
    nG6oViWqmvvQXHCp
    • With both hands, pull down the front edge of the light unit until it pops free.

    • Don't try to fully remove the light unit yet, as it is still connected to the refrigerator by some wires.

  6. usU5AT6w6U1Z5HQu
    usU5AT6w6U1Z5HQu
    d3BYWHqT6QNHlfLN
    wbHsFCSFfjJQEHhY
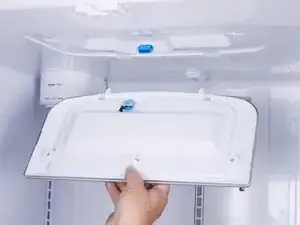
    • Pinch the light unit connector to release it and pull it out straight to disconnect.

    • Remove the light unit.

  7. liupNfIKtQGlIRQo
    liupNfIKtQGlIRQo
    SFoIyC4Ic6TWM5iU
    6RmbxmVF2SGKvWaP
    • Use a spudger to pry and release the two clips on the rear edge of the light.

  8. WSQkEHhSR5ohcTLw
    WSQkEHhSR5ohcTLw
    Bk3tSmjrptKIuRXm
    AO3PF6errHCLQSsK
    • Use a spudger to pry and release the sides of the light cover from the light base.

  9. PvRG2PIXfUEVZ4TJ
    • Separate the light base from the light cover.

  10. EE2WKtegbnZNOqdm
    • Use a Philips head driver to remove the screws securing the light module.

  11. YOOKCfg2tLsJIlwc
    YOOKCfg2tLsJIlwc
    kaHOFt4ZYCoiqVR3
    • Lift the light module out of the light base and remove it.

Conclusion

To reassemble your device, follow these instructions in reverse order.

Take your e-waste to an R2 or e-Stewards certified recycler.

Repair didn’t go as planned? Try some basic troubleshooting, or ask our  Answers community for help.

Bill Gilbert

Member since: 30/06/22

35117 Reputation

0 comments