Introduction

Fixing the common problem of lines/bars on the original Nintendo Gameboy.

  1. RGmrtMWJ22OpxZFE
    RGmrtMWJ22OpxZFE
    tNtPdItZdLZBTNWp
    NcYqWKSBrD24DMaP
    • Remove the back housing by removing the 6 Tri-Point or Philip screws.

    • Note: The last 2 screws are in the battery compartment.

  2. 5XsrOwwGJqbDjQ4n
    5XsrOwwGJqbDjQ4n
    IdJxrHITpNEKj6Q4
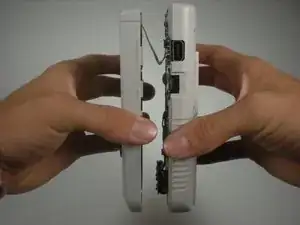
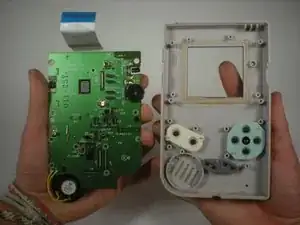
    • Carefully lift up the top half of the system. Be careful, there's a ribbon cable that connects the top and bottom half of the system.

    • Remove the ribbon cable for the next step.

  3. VLdVw2kJEhanXVEY
    VLdVw2kJEhanXVEY
    FAfgnq5ODr43ZnYd
    TmpLEijPNdKvLHKE
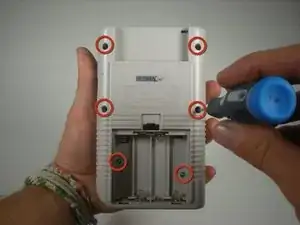
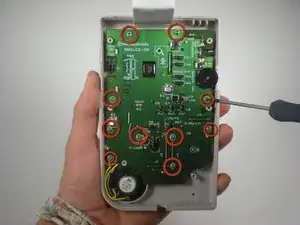
    • Now there will be screws that mount the board to the front, carefully unscrew these.

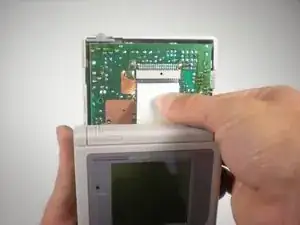
    • Now remove the board from the housing.

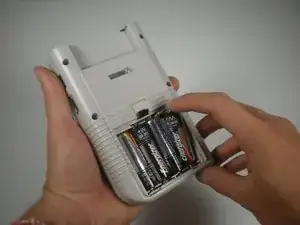
    • Now put the batteries back into the compartment, so you can test the screen while you fix it.

    • Reconnect the the board to back housing with the ribbon cable.

  4. DyUTe2WEwug3gJvn
    • You're now going to turn the contrast ( the slider on the left) all the way up, and take your soldering iron and gently move it back and forth on the ribbon cable below the screen.

    • Make sure not to touch the screen itself.

    • Note: There may be a rubber strip covering the ribbon.

    one picture should show where to exactly put the soldering iron.

    Helmut Kohli -

    The picture does not completely match the description.

    Helmut Kohli -

    it would be handy to know what temperature to set for the soldering iron

    Vincenzo -

    You should set it to 450, according to another repair demonstration.

    Bossman207 -

    There are two screws indicated but not mentioned and there is no ribbon cable in sight, unless it's behind that brown plastic cover looking thing. I have to assume I'm to remove the indicated screws and would see a ribbon cable behind it and under the screen? Otherwise, maybe you run the iron in between the two screws and the brown thing is somehow the cable? This is the most I've ever been puzzled by one of these guides. I'd just hope when I got to this part I'll be able to determine what's being said.

    Bossman207 -

    https://www.youtube.com/watch?v=-OEXhxoT... shows the repair and includes additional details about the area to place the iron.

    The red circled screws have no part of this step.

    You need to remove the rubber strip you see in the picture that's below and along the bottom of the screen.
    Set iron to 450
    Run iron along areas that coincide with the problem lines.
    Replace rubber strip when done.

    Bossman207 -

    • You will start to see the lines of pixels fade in and out, keep moving your iron back and forth until screen is completely black.

Conclusion

To reassemble your device, follow these instructions in reverse order.

Mitchell

Member since: 03/04/16

184 Reputation

2 comments

Hi, this is the second time I attempt this fix, the first time it worked perfectly. The problem is that with this second machine there's a couple of pixel lines that have not tickled back to black even though I have been patiently going over them for quite some time (2 rounds of 10-15 min) is there anything else that I could try or should I just go on over the same area until I see something happen? Thanks in advance

Jose Saura -

Use this guide linked below understand where to place the iron under the screen. Step 4 doesn't seem to contain the proper images or details of this step here well enough.

https://www.youtube.com/watch?v=-OEXhxoT...

Bossman207 -